Week 1:
Project Design Concept
The design of our mind puzzle will be cylindrical in shape. This cylinder will be separated into three different sections that connect together with one another to form the mind game. Engraved within each part of this cylinder will be sections of a maze. This maze will not be visible from the outside and will be completed by pulling a rod through its course. This rod will be created with a small piece extruded at its end that fits directly into the engraved maze. The three different sections of the cylinder will be able to be twisted in their circular motion in order to work the rod through the maze to its end.
Below are some rough sketches of some of our ideas.


Above is a rough sketch of what the Inside-Out Maze will look like from an outside view.
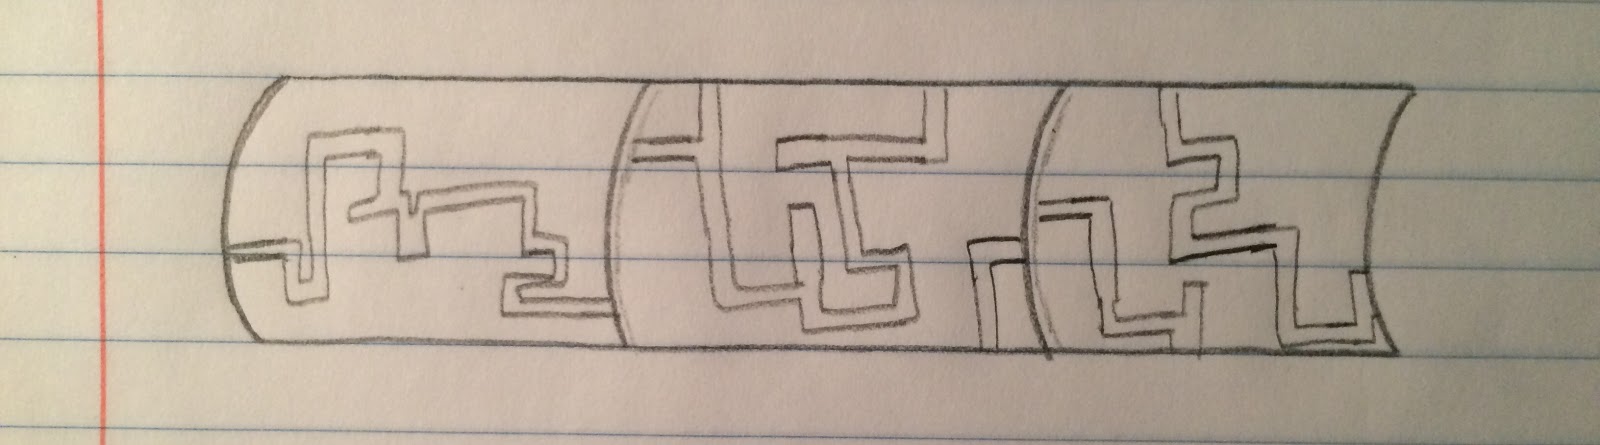
Above is a cross section of the cylinder to show an example of how the maze will run throughout the inside. The maze does not connect from section to section so that the user will have to rotate the sections to connect the maze together.

Lastly, above is a rough sketch of what the inside rod that will be used to navigate through the maze will look like. The mall extrusion on the left end would be the part moving within the engraved part of the maze, while the used moves this rod with the right end.
In order to fabricate this mind game it will be modeled using Autodesk's Inventor. We then wish to 3D print our finished product. When designing this toy it will be very important to pay attention to measurements to ensure that the rod fits perfectly into the engraved maze within the cylinders.
Week 2:
Inventor Model
Throughout this week Johan has worked on 3-D modeling the main part of our design. He has created the three cylindrical pieces that have the maze engraved within them. These pieces were modeled in half cylinders and will be glued together once they have been 3-D printed. They are shown as follows:


Throughout this week Johan has worked on 3-D modeling the main part of our design. He has created the three cylindrical pieces that have the maze engraved within them. These pieces were modeled in half cylinders and will be glued together once they have been 3-D printed. They are shown as follows:


When these pieces are assembled together, the Inside-Out Maze will look like the following picture.

In this picture the half cylinders are connected together, as well as the three cylinders that are able to rotate in a circular motion. We still have to work on the design of the rod that will be used to navigate throughout the maze inside. This part is not going to be 3-D printed due to request, but instead will be made of aluminum. This aluminum will need to be purchased and the design will be fabricated in the machine shop.
Competitive Product Analysis
The main competitor our Inside-Out Maze has is mind puzzles made by Sonic Games such as Isis Adventure and Pentarasus Adventure. These puzzles are made out of different shapes such as spheres, pyramids, boxes, etc. They are similar to the Inside-Out Maze because their puzzles are also within them and cannot be seen. Although, these Sonic Game puzzles are much more expensive and cost from $300-$600. The Inside-Out Puzzle will be much cheaper than our competitor because it will be made of plastic once it is 3-D printed. The middle rod is going to be made out of metal but will still be cheaper to create than the puzzles Isis Adventures and Pentarasus Adventures created by Sonic Games. Our puzzle is also somewhat more complex and will appeal to those who want more of a challenge. The puzzles below are the most famous puzzles in the Isis Adventures.


Budget
The material used to build the Inside-Out Maze is mostly the plastic for the 3-D printer, which according to our TA is approximately $12 per square inch. The middle rod will be fabricated out of aluminum to navigate throughout the maze engraved on the inside of the 3-D printed cylinder. To determine the total cost of the Inside-Out Maze, the volume of the cylinder must first be found.
Volume of a cylinder = πr^2h
Volume of our cylinder = π(2inches)^2*(10 inches) - π(1.7inches)^2*(10 inches)
Volume of our cylinder = 34.87 square inches
To find the cost of the plastic for the 3-D printer we multiplied the total square inches by the $12 cost per square inch.
34.87 square inches * 12 dollars / square inch = $418.46
The cost of the 3-D plastic is about $418.46.
The aluminum rod cost was looked up online. On Zoro we found an aluminum rod that is 1.5 inches in diameter and 1 foot long. The cost of this rod is $13.07.
This means the total cost of the Inside-Out Maze is as follows:
$418.46 + $13.07 = $431.53

Competitive Product Analysis
The main competitor our Inside-Out Maze has is mind puzzles made by Sonic Games such as Isis Adventure and Pentarasus Adventure. These puzzles are made out of different shapes such as spheres, pyramids, boxes, etc. They are similar to the Inside-Out Maze because their puzzles are also within them and cannot be seen. Although, these Sonic Game puzzles are much more expensive and cost from $300-$600. The Inside-Out Puzzle will be much cheaper than our competitor because it will be made of plastic once it is 3-D printed. The middle rod is going to be made out of metal but will still be cheaper to create than the puzzles Isis Adventures and Pentarasus Adventures created by Sonic Games. Our puzzle is also somewhat more complex and will appeal to those who want more of a challenge. The puzzles below are the most famous puzzles in the Isis Adventures.
Week 3:
This week we have sent our CAD drawings to be 3-D printed and are waiting to receive the results. We also formed our budget.
The material used to build the Inside-Out Maze is mostly the plastic for the 3-D printer, which according to our TA is approximately $12 per square inch. The middle rod will be fabricated out of aluminum to navigate throughout the maze engraved on the inside of the 3-D printed cylinder. To determine the total cost of the Inside-Out Maze, the volume of the cylinder must first be found.
Volume of a cylinder = πr^2h
Volume of our cylinder = π(2inches)^2*(10 inches) - π(1.7inches)^2*(10 inches)
Volume of our cylinder = 34.87 square inches
To find the cost of the plastic for the 3-D printer we multiplied the total square inches by the $12 cost per square inch.
34.87 square inches * 12 dollars / square inch = $418.46
The cost of the 3-D plastic is about $418.46.
The aluminum rod cost was looked up online. On Zoro we found an aluminum rod that is 1.5 inches in diameter and 1 foot long. The cost of this rod is $13.07.
This means the total cost of the Inside-Out Maze is as follows:
$418.46 + $13.07 = $431.53
Week 4:
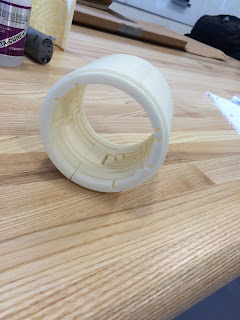
This week we received our 3-D printed parts for the outer cylinder of the Inside-Out Maze.
This picture shows the full printed Inside-Out Maze and how it will fit together.
To complete the assembly of this maze the half cylinders will need to be glued together. The only fabrication left is creating the middle rod to be able to move through the maze. This rod is not going to be 3-D printed, but made of aluminum.
Week 5:
This week we worked on ordering materials for the middle rod that goes inside the cylinder. We decided to change our design to make the rod from wood rather than aluminum. We changed our design because wood would be softer than metal and would not wear down the plastic inside the Inside-Out Maze. The wood rod we purchased was only $4.00 which makes our budget a few dollars cheaper as well. The wood rod is 1 inch in diameter and 14 inches long. We also had an idea that the peg extruding from the wood rod would be made from steel.

The budget for our project must be updated to accommodate these changes. The cost of the plastic remains the same, but the aluminum rod is being replaced with the wood rod and the small metal piece.
The cost of the 3-D plastic is about $418.46.
The wooden rod was bought at Home Depot and was about $4.00. This rod is 1 inch in diameter and came as a 4 foot long rod. The piece we will need is 1 foot long, so the cost would be $1.00.
The steel wire comes in a pack of 9 pieces that are .125 inches thick and 36 inches long. The cost of this pack is $13.42. For our design we will need a much smaller piece that is 1 inch long. To calculate the cost of one piece we will need we did some calculations.
$13.42 / 9 = $1.49 per rod.
$1.49 / 36 inches = $0.04 per inch of rod.
This means the total cost of the Inside-Out Maze is as follows:
$418.46 + $1.00 + $0.04 = $419.50
Week 6:
This week we worked on sanding down the 3-D printed parts of our outer cylinder. We did this to make sure the different sections would twist and be able to move more easily.


We also assembled a few of the half cylinders to make them a full cylinder.


This picture shows the wood rod and a piece of aluminum rod that will be used to make the inside rod. The aluminum piece will need to be cut down in order to fit within the outer cylinder.
The budget for our project must be updated to accommodate these changes. The cost of the plastic remains the same, but the aluminum rod is being replaced with the wood rod and the small metal piece.
The cost of the 3-D plastic is about $418.46.
The wooden rod was bought at Home Depot and was about $4.00. This rod is 1 inch in diameter and came as a 4 foot long rod. The piece we will need is 1 foot long, so the cost would be $1.00.
The steel wire comes in a pack of 9 pieces that are .125 inches thick and 36 inches long. The cost of this pack is $13.42. For our design we will need a much smaller piece that is 1 inch long. To calculate the cost of one piece we will need we did some calculations.
$13.42 / 9 = $1.49 per rod.
$1.49 / 36 inches = $0.04 per inch of rod.
This means the total cost of the Inside-Out Maze is as follows:
$418.46 + $1.00 + $0.04 = $419.50
Week 6:
This week we worked on sanding down the 3-D printed parts of our outer cylinder. We did this to make sure the different sections would twist and be able to move more easily.
We also assembled a few of the half cylinders to make them a full cylinder.
Above are a few pictures of one of the cylinders completely assembled.
In the picture above is the glue our team used to assemble the cylinders together.
This week we also brainstormed ideas on how to keep the center rod in the center.
Week 7:
This week we finished gluing the pieces of our cylindrical puzzle together and sanding down some sharp edges. We also drilled a hole in the middle wooden rod to input the steel peg into it. This can be seen in the following pictures of the Inside-Out Maze.


Week 7:
This week we finished gluing the pieces of our cylindrical puzzle together and sanding down some sharp edges. We also drilled a hole in the middle wooden rod to input the steel peg into it. This can be seen in the following pictures of the Inside-Out Maze.
The steel peg needs to be cut down some in order to place the wooden rod in the middle of the cylinder. Next we plan on adding a clear plastic or acrylic cap on the bottom end of the cylinder. In this cap there will be a hole in the center for the wooden rod to go through as well as a slot of the peg to come through once the puzzle is completed. This cap will help support the wooden rod in the middle and also be clear to provide sight into the puzzle.
Week 8:
Throughout the course of this week we obtained the acrylic to make the end cap for the puzzle. The end cap is to hold the wooden rod in place while using the Inside-Out Maze. We measured the circle to fit the outside of the cylinder and the inside hole to hold the wooden rod within it. There is also going to be a hole for the peg to slide through at the end of the maze once it is completed.

We also used the laser cutter in the Machine Shop to cut the acrylic as you can see it assembled in the picture below. This picture shows the clear acrylic cap that is attached at the end of the maze with the wood rod going through it. If you look closely you can also see the slice cut out towards the bottom of the circle. This slice is so the peg can slide through the end of the maze.
We have also decided to add the cap onto the top of the puzzle. This cap will be attached with a latch rather than glue. This will make the cap removable to make it easy to re-insert the rod into the puzzle once it has been completed.
No comments:
Post a Comment